3 Easy and Quick Portrait Lighting Setups for Beginners

In today’s post we’re going to talk about 3 easy and quick portrait lighting setups for beginners.
One of the hardest things I experienced as a beginner, was not knowing how to create a simple lighting setup. I’d always imagined that portrait lighting consisted of elaborate lighting diagrams with 3-6 lights or more and it became a large part of why I started to shy away from working in studio.
You can check out my previous blog post on how I overcame my fear of studio photography here.
What I didn’t know at the time was that a large majority of portraits, (including beauty portraits,) consisted of less than 3 lights. It took quite a long time to come to this realisation, and when I finally did I began to experiment using a home studio.
While shooting in a home studio in my small 2 bedroom apartment in Melbourne, I needed to adapt to working in a smaller space. Hence, there was limitations on how many lights I was able to use in the space.
So in today’s blog post we’re going to go over easy and quick portrait lighting setups for beginners. (They’re also perfect for small spaces!)
Portrait Lighting Setups for Beginners
This post may contain affiliate links, if you click them and purchase products I may earn a small commission. This is at no extra cost to you and helps to support my blog. I only recommend products I use and all thoughts/opinions are my own.
#1 One light with an octabox modifier & reflector
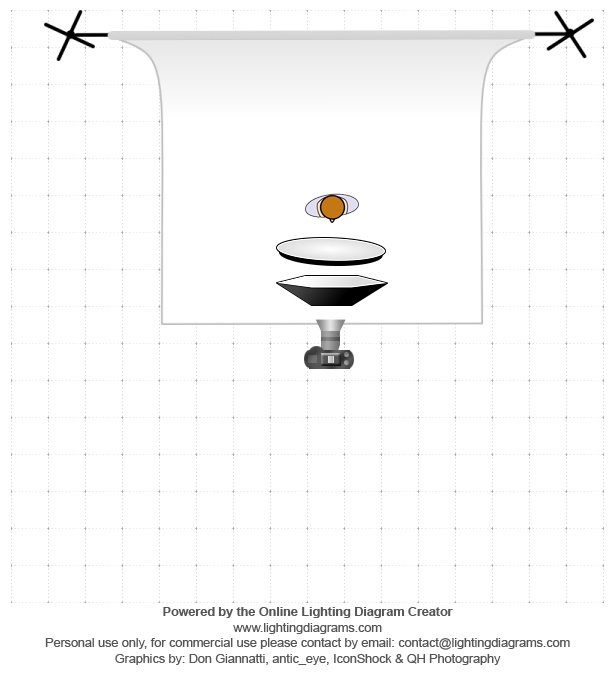
This was one of the most basic lighting setups I used initially when I was still learning about studio lighting. It was also easy, compact and effective for working in a small home studio.
This particular setup is perfect with a mid-sized octabox, as in a smaller space it can also emit enough light to illuminate the backdrop. Raising the light high and angling it down so the light hits the model’s face from above helps to achieve those flattering butterfly shadows on the face.
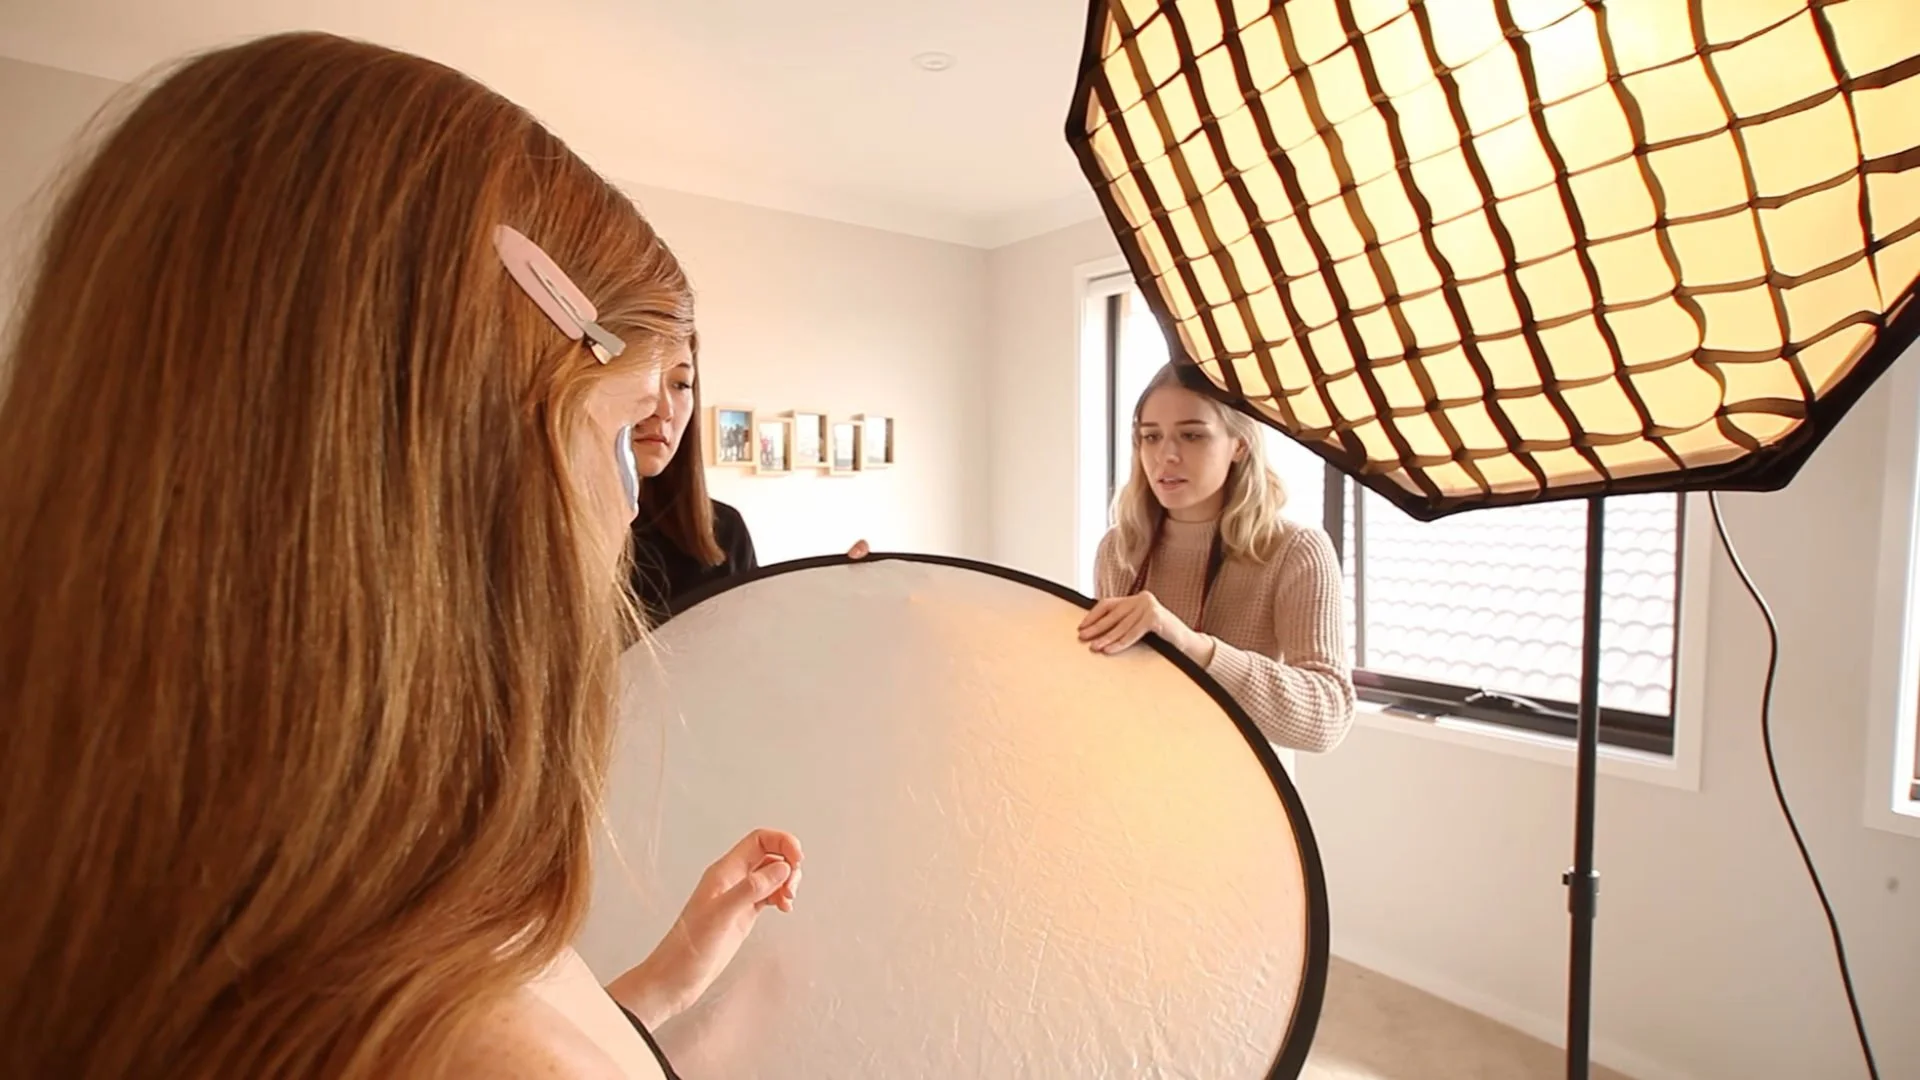
I would also place this light around 1 metre away, (3 feet or so,) directly in front of the model. Then incorporate a white or silver reflector angled underneath the model’s face to illuminate the eyes and create some pretty catchlights.

#2 Two Lights – Key light with Octobox/Beauty Dish & Secondary light for backdrop illumination

If you’re finding that one light isn’t enough to illuminate your backdrop, you may need to add another light. This particular setup is great for lighting your model, and also adding a little bit of punch in vibrancy to the backdrop.
The way I would set this up, is use one key light directly in front of the model, around one metre away (3 feet or so.) Then I would raise it high and angle it down to once again get those flattering shadows on the face.
You can use either an octabox or beauty dish modifier for the key light depending on whether you’d like the lighting to be softer or harder.
Then I would position the second light at a 45 degree angle off to the side and at the back of the model, angled towards the backdrop. I would usually choose a softbox modifier for this light as it avoids having any hotspots on the backdrop and emits a more even light. A regular square softbox would be fine for this.


#3 Clamshell Lighting – Two lights with softbox modifiers

Admittedly this is a setup I don’t use as often as I would like but it happens to be an extremely flattering type of light. Clamshell lighting is created by using two lights and positioning them in a “clam” position in front of the model. (Once again about a metre away, raised high and angled down.)
In using this setup, you will see that it creates incredible ‘sparkly’ catchlights in the subject’s eyes and it also creates a beautiful glowing effect.
For this setup I would use two square softbox modifiers, (however you can use varying shapes and sizes.)


So there you have it! I hope you all enjoyed this blog post on 3 easy and quick portrait lighting setups for beginners. You can also check out the video I filmed in more detail on this subject on my YouTube channel below.
All of my links to my studio equipment can be found below and via the resources page.
My studio lights & equipment
Elinchrom D-Lite RX4 Octabox & Softbox Kit
Amazon: https://amzn.to/3fZ9VD2
B&H Photo: https://bhpho.to/3fME6yc
Camera Pro (Australia): https://bit.ly/3cdknWw
Elinchrom 44cm Beauty Dish (White)
Amazon: https://amzn.to/2RZaB3s
B&H Photo: https://bhpho.to/3ie1NS2
Aputure Amaran 672 (Video LED Lights)
Amazon: https://amzn.to/3uNAmAZ
B&H Photo: https://bhpho.to/3ieWd1A
Camera Pro (Australia): https://bit.ly/3fLokDX
Backdrops – Savage Universal
Amazon: https://amzn.to/3g3HBzw
B&H Photo: https://bhpho.to/3ikFoSK
Images processed with Capture One Pro (USE CODE: JUNE10 for 10% DISCOUNT) : https://bit.ly/3z8AYVk
Adobe Photoshop CC & Lightroom CC: https://bit.ly/2SQ3Fpd
Canon 5D Mark IV (Main Camera)
Amazon: https://amzn.to/3idcO5L
B&H Photo: https://bhpho.to/3yXYZyc
Camera Pro (Australia): https://bit.ly/34IvwdO
Canon 24-70mm f2.8L
Amazon: https://amzn.to/3wRh8Mf
B&H Photo: https://bhpho.to/34Hi0XL
Camera Pro (Australia): https://bit.ly/3uIUhkn
Canon 100mm f2.8L Macro
Amazon: https://amzn.to/3cdMyo4
B&H Photo: https://bhpho.to/34HipcJ
Camera Pro (Australia): https://bit.ly/2Ts4PHJ